Showing posts with label In the Studio. Show all posts

Tuesday, 21 April 2015

Head Shots

I was asked to do some head shots for a lady, Carrie, who was auditioning for a singing job.  I asked her what her requirements were, advised on the different backdrops available, and invited her into the studio for a shoot.  Here are the photo's:

We tried different poses, a natural pose with her head tilted to the side...

The above image, cropped in to fill the frame...


Looking over the shoulder - I feel the smile in this photo is a little forced...

I asked Carrie to 'lift her chin/pull her head forward a little' - she was very pleased with this result as it removed the extra chin! 

To me, this is the most natural pose, but I adjusted the white balance to 'Flash' in Photoshop and I think this has made the image a bit too warm.

And finally, we had some silly time :) 

Sunday, 5 April 2015

Studio - Still Life

My Still Life Images

“Growth”

This is one of my attempts at black and white Still Life photography.  I placed one softbox (as a continuous light source) to the right of the camera at just above head height & at a 45 degree angle, and another the other side of the camera at the same angle.  My camera settings were:  Manual exposure mode, 1/60 sec, F/11, ISO100 and WB Auto. I should’ve experimented with the white balance set to tungsten but quite liked the result so left it as is.
My intent was to show some depth of field. By placing some stones in the background and focussing on the light reflections on the vase, I was able to achieve this result.  The settings on the light to the right of the camera were lower, hence the shadows to the right and bottom of the image. 


This is simply some metallic butterfly confetti, placed on top of a light box – experimentation. 


We found a foot in the studio so I took the opportunity to photograph it.  Admittedly, I didn’t put a lot of thought into the lighting, or white balance, hence the blue tinged background, but we just wanted to experiment at this stage.  If I was to take a more professional image of this foot, I would have directed a light source at the background or used a wireless flash trigger and strobe/flash lights.


An attempt at injecting some humour into our foot’s photo shoot J


This photo was taken in the college studio with one beauty dish light placed to the front right of the set-up, at a 45 degree angle, emitting a soft, gentle & continuous light.  Rather than focussing on the reflected light on the vase, I focussed on the flower head which threw the background and some of the leaves slightly out of focus, giving a little depth of field. It is a dark photo as my settings weren’t quite correct.  My shutter speed was 1/125 sec, F/5.6 and ISO100.  In future, I would change the shutter speed to 1/60 sec, maybe F/8 or F/11 and keep the ISO at 100.


This was the studio set up:


Finally, for this image, we kept the vase away from the background, I used the black and white setting on the camera, and focussed on the middle flower in order to show some depth of field.  I thought the background would show more contrast and look textured in black and white. I like the highlights in this image but although it looks a little grainy due to increasing the ISO to 400, I was also pleased with this effect.  

Thursday, 2 April 2015

Studio - Lighting Styles

Lighting Styles

There are 7 main lighting styles that are used in Studio photography and I'm going to look at them in this post. 


REMBRANDT lighting is achieved by placing a single main or ‘key light’ at a high angle, approximately 45 degrees from the model or subject.  The model turns away from the light slightly, so that one half of the face is shadowed, with a triangle of light on the far cheek, just under the eye.   The shadow side can be lightened by using a ‘fill light’ roughly half the strength of the main or key light, or by using a reflector on the far side of the model. 


This is what a basic 'Rembrandt' lighting set up would look like: 


SPLIT lighting uses one strong light positioned directly to one side of the model to create a dramatic portrait, where one side of the face is lit and the other is completely in shadow.  Split lighting is usually used with the subject facing square to the camera. It is a moody ‘accent’ lighting option and is often used when a dramatic feel to the image is required. 


This is what a basic 'Split' lighting set up would look like: 


BROAD lighting - The subject is posed such that the main light is directed at the side of the face that is closest to the camera.  This can sometimes add weight to the face and may be unflattering in some instances, but would be an ideal style of lighting for a thin model. 


This is what a basic 'Broad' lighting set up would look like: 


SHORT lighting in basic terms is where the side of the models face that is furthest from the camera, gets the main light.  The side of the face closest to the camera will get less light.  This lighting set up may slim the face. 


This is what a basic 'Short' lighting set up would look like: 


BUTTERFLY lighting – positioning your main/key light with a Softbox directly in front of the models face, but raised to above head height, creates a butterfly lighting effect – a soft shadow under the nose and/or cheekbones.  It can be softened with a ‘fill’ light or by the model holding a reflector, making this a very glamorous beauty light for women. 


This is what a basic 'Butterfly' lighting set up would look like: 


LOOP lighting – To create this effect you would adjust the main/key light so that the shadow of the nose forms a little loop under the models cheek.  This is an alternate to ‘butterfly’ lighting, is easy to create and suits most faces. 


This is what a basic 'Loop' lighting set up would look like: 


RIM lighting is achieved by positioning a rim light behind the model (must not be visible) and facing the camera so that it illuminates the edges of the model, visually separating it from the background and emphasising the models shape.  Due to the highlight around the hairline, this is also known as HAIR lighting. 


This is what a basic 'Rim or Hair' lighting set up would look like: 


PARAMOUNT lighting is a combination of all of the above lighting styles.  It is also sometimes referred to as Butterfly as it often leaves a shadow under the nose. 


Portraiture - Low Key - Beth

A lady in our group, Beth, kindly offered to be our model so that we could experiment with using different coloured filters placed over the top of a red head light, to see what effects we could produce. These are the results of my experimentation:


A red head light was set up to the right of the camera.  I asked Beth to turn towards the light so that shadows fell across her face. This has produced a combination of lighting style - Rembrandt (triangle of light under her eye/across her cheek), short lighting (the side of her face furthest away from the camera is the most lit), and she has catch lights in her eyes. This lighting has given the image quite a ‘soft’ beautified look too. 


Same lighting set up used, but a green coloured filter was placed over the light. 


Without moving the red head light, I asked Beth to turn sideways to the camera and to look over her shoulder, whilst making her laugh so she flashed a smile.  This is the resulting image.  I shot it in black and white so no photoshop adjustments were made.  My criticism with this image is that there is only one catch light in one eye so next time I try this pose, I will consider the angle at which I’m asking the model to sit or stand, to ensure catch lights are more prominent. This image also looks a little grainy. 

Portraiture - Low Key - Media Make-Up Shoot - "Facial Hair"

The media make up team required some photos of their models for their ‘Facial Hair’ assessment. Here are the images that I produced:


A dark background was requested by the make-up artist so we used black. I asked the model to sit at a slight angle and turn his head to face the camera.  One small soft box light was used to the left of the camera (to the right of the model), and it was positioned above the models head at a 45 degree angle.  This produced a ‘Rembrandt’ lighting effect (a triangle of light that falls across the cheek/under the eye), which we were all pleased with. 


The same lighting set up was used for this image, but I stood on a set of steps, took this picture from slightly above the models head and asked him to look up to the camera. He has catch lights in his eyes and smile-less expression makes him look moody. 

Portraiture - Low Key - Media Make-Up Shoot - 'Sci-Fi'

Low Key Photography

Using Low Key lighting for portraits or still life photography can be very effective in creating ‘mood’ in an image.   Low key photography uses shadows and dark tones to create drama, mood and atmosphere in an image. Unlike High Key photography that requires plenty of light, Low Key requires very little.  The backdrop needs to be dark, while your subject (or particular features of it), needs to be illuminated to ensure it stands out.

The key is to use lighting selectively so that only certain parts of the image are illuminated.  As a photographer you would normally try to avoid intense shadows, but for a low key shoot, you need to arrange the lighting and positioning of your subject, so that the shadows fall in the right place, to obtain the look you are striving for.
                               

My attempts at creating Low Key Images

The media make-up team asked us to assist them with some photographs of their models, which would contribute towards their final assessment.  The subject was Sci-Fi.
My task was to simply produce some photographs which show a full length pose, and some close up images.  We had a very short space of time in which to complete this so I found that I had to really think on my feet.  Luckily, my model was very accommodating and was more than happy for me to have some fun with him.  Capturing him in some silly poses made him more confident in front of the camera.  A while after the shoot, I was thanked for making him feel so at ease, praised for the images that I took, and the team even offered to model for me any time I need them in the future! 

Studio Set-up:  I used a black background, the large soft box light as a main light, positioned to my right at a 45 degree angle to the model – set to number 4, and the light was on permanently, as opposed to being used as a flash light, to ensure the detail in the make-up and prosthetics were captured as fully as possible, but the background remained as dark as possible.  I positioned the model away from the background to eliminate any shadows or lines in the image.

Camera settings used:
 Shutter speed 1/60
ISO100

Aperture F/6.3


The above image was just a practise shot.  I have cropped out the media make-up artist who was straightening the model’s boiler suit. I have captured plenty of detail in the prosthetic ears and face, although there are no catch lights in his eyes as he was facing away from the light. 


This is a similar image to the first in that I have captured lots of detail in the prosthetics and make-up, but I have also captured the catch lights in the model’s eyes. The backdrops are pure black which is the look I wanted to achieve. 


Because the model’s make up and clothing were already so dark in colour, I wanted to try a black and white shot to see how much I could add contrast and to see the highlights in a different way.  The model was facing the soft box light, so there are small catch lights in his eyes, and the light has illuminated his face, hands and arms by reflecting off of the metallic body paint.  I feel that this was one of my less successful photographs as there is too much light reflecting off the face/nose, and the background isn’t black enough, although viewing it in a slightly more creative way, I do like the lighter circular area in the middle of the background as I feel it’s given the image a distressed look.  In future, to remove the ‘hot spot’ of light on the models face, I would either move the model further away from the light, reduce the power on the light or diffuse with a reflector. 


 “Star Gazing”

This image is similar to the previous ones, but I think the light is more evenly spread across the model’s face, which emphasises more of the detail, and there is no concentration of light in any one area which has prevented detail being lost. The model has catch lights in his eyes, bringing his face to life, and although there is a slightly lighter area of the background, it is nice and dark, which is the look we wanted. Next time I do a low key shoot, I would move the model further away from the background so that the background stays as black as I intended it to be. 


Despite facing the same issues with this image as with some of the others, such as a lighter background than intended, I really like this photograph.  The light directed at the model is even, the image shows depth, detail and it shows that the model had fun with his poses. There are even some small catch lights if you look closely enough! I have used ‘smart sharpen’ in photo shop and adjusted the levels very slightly to get the most out of this image. 


This is another example of the ‘fun’ images we took towards the end of the shoot.  The model is closer to the light and there was a little too much light directed at the side of his head, so I adjusted the highlights a little in photoshop.  There are catch lights in his eyes, you can still see the outline of the dark boiler suit against the background and the model has a cheeky glint in his eye.  There is a slight element of depth where he is at an angle to the camera. I have also considered composition in this image and the rule of thirds. 

Below is a selection of the images I captured from the ‘silly’ and more fun part of the photo shoot:   


Wednesday, 1 April 2015

Portraiture - High Key - Media Make-Up Shoot

Media Make-Up Assessment Shoot


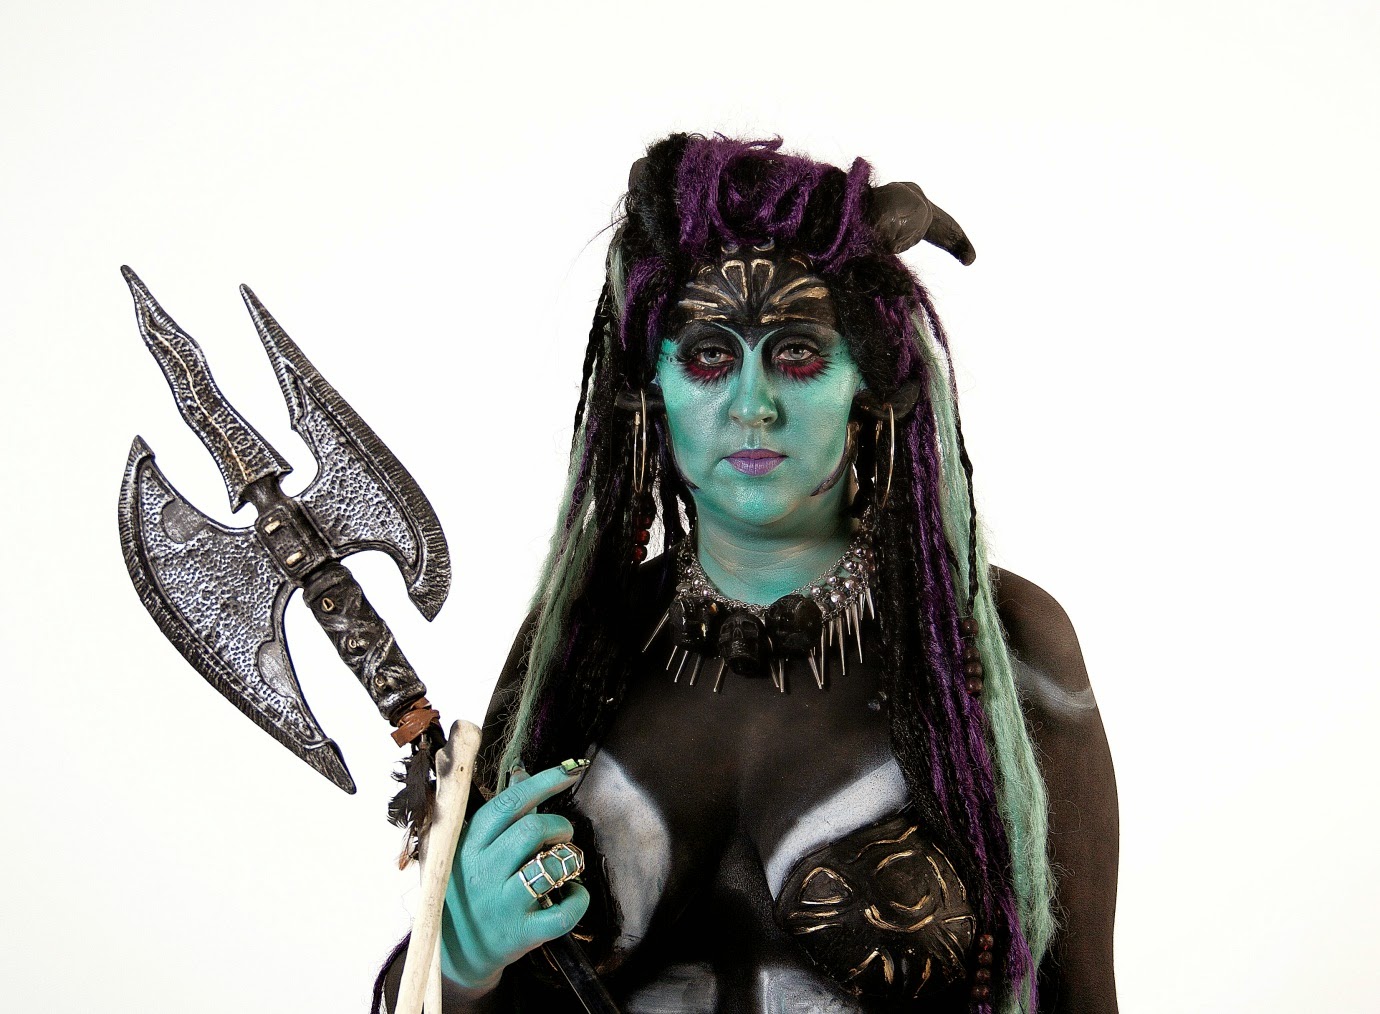
I was asked to photograph some media make-up models, to assist the make-up artists with their upcoming assessments.  This challenged me hugely as I had never had to pose non-models unknown to me before.  I introduced myself and had a discussion with the make-up artist prior to the shoot to ascertain their requirements, to find out if there was anything in particular they wanted me to do/not to do, etc.  This was the start of a professional working relationship.  I was relied on fully, to pose the model and make her feel at ease.  The make-up artist requested simple, high key, landscape, portrait, full length and portrait/head & shoulders photographs, of which I was able to provide all.  Here are a few examples of my images:

IMAGE 1

i


For this shoot, I used 2 x soft boxes – one as a main light and the other as a fill light – placed in front of the model, to the corners, at 45 degrees.  I used the wireless flash trigger and a white background.  No tripod was used. My camera settings were ISO 100, Auto WB, 1/160 sec, F/8.  In photoshop, I increased the brightness and contrast a little, and used ‘smart sharpen’ to inject some additional detail into the hair, jewellery and staff.

If I did this shoot again, I would’ve increased the brightness on the soft boxes.  For example, they were set between 4 & 5, but I would increase them both a little to around 5 or 5 ½.  I also would’ve used a tripod to ensure a sharper image.  If I’d had more time, I would’ve also liked to try this against a darker background and using a RIM light to make the model stand out from the background.  

These are other photographs from the same media make-up shoot.  I used the same light set up, camera settings and minor Photoshop enhancements:


I placed the model further away from the background in this image to ensure there were no shadows – and it was successful! The Staff she is holding, blocks the light a little though so there is a slight shadow across her face.  In future, I could use a Reflector the other side to combat this. 


I focussed more on the forehead detail and eyes in this image, which has thrown some of the hair at the back a little out of focus, giving it a delicate blurry depth of field effect.  I have managed to capture catch lights in her eyes, giving her a less ‘soul-less’ look. 


Images of the details were required for this assessment so I captured this image of the model’s hands framing the necklace.  This shows the detail in the jewellery, the nails, some of the hair, and body paint. I think the slight angle gives this image some additional interest.

Portraiture - High Key - Family & Friends

High Key Portraiture

Photographing in ‘high key’ simply means applying lots of light to illuminate a subject so much so, that you eliminate all or most of the harsh shadows. High Key photography is used to convey a positive/bright tone and is often used to photograph subjects that are beautiful, funny, or light-hearted. This style of photography was originally developed for use in films, as a solution for screens that couldn’t display contrast properly, but it has evolved into more of a style choice.

My attempts at creating High Key Images


IMAGE 1

BEFORE

AFTER

The children of a friend of mine, were only too happy to visit the studio and model for me which made my  job a much easier as they were excited to be there (showing them the darkroom helped!), and they were happy to do whatever I asked of them.

Studio:  I used a white background, 2 x softboxes situated to the front 2 corners (45 degrees) of the models, 1 x light facing the background to inject more light into the setup, and Wireless flash triggers.  The lights were set to between 4 and 5 on the settings.  I used this setup throughout the entire family/children shoot.

Camera:  I always use a Canon EOS 400D with either a 50mm lens or 18-135 zoom lens, depending on where and what I am photographing.
For this high key shoot, my settings were F/6.3, ISO 100, 1/125sec and metering mode was set to Evaluative/Pattern as from what I’ve learnt so far, this seems to be a good all-round metering mode. 

Post-processing:  I used ‘levels’ in Photoshop to inject a little more white into this image as I considered the original image to be a little grey. 

The original image was a little too dark on the floor.  There are grey areas which I wanted to appear whiter so I think I should’ve perhaps lowered the lights for this floor shoot to ensure that enough light was hitting the models. You can see that their faces/skin looks flat and grey although if you look closely enough, I have managed to get the catch-lights in their eyes – I think these would appear more prominent if I’d lowered the lights too.  I’d set the lights up for a mid-height (eye level) shoot as the models were just going to be standing.  Of course, this changed throughout the shoot, so for future shoots, I would be ready and prepared to adjust the position of the lights where necessary to minimise shadows and ensure enough light is being directed exactly where I need it to.  For the entire time, I was conscious of keeping the children safe in the Studio, and with them being excitable it reminded me that I need to be able to think about a lot of things at once!


IMAGE 2

During the same photo shoot, I was asked to produce a series of black & white photographs too.  I captured this image in colour before converting it into black & white using Photoshop.  I thought I would try turning the camera at a slight angle, to photograph the baby straight-on, hoping this would add some interest to the image.  I was pleased with the result of trying this!  There is more light to the top left corner of the image compared to the top right corner – again, this was because I had only one light  directed at the background and on reflection, I should have used 2, to spread the light more evenly across the background. Maybe positioning just the one light a little less close to the background would help with this too? I will try this in future practise shoots.

I didn’t pay too much attention to composition with this image, as I just wanted to capture the detail of the hair, facial features and convey the loving emotion from the older sister to younger brother.  I was thinking of ‘portrait photography tips’ during this time though so I did not let the girls nose break the outline of her face. The camera angle looking down slightly onto the models has made this image a little more flattering. 

BEFORE

AFTER

As you can see in this original image, there isn’t as much light on the right side of the image in comparison to the left side, and overall, the colour is a little flat.  I did not change the White Balance setting on the camera at all during this shoot, which is one contributory factor to this image not being as vibrant as it could be.  I need to try either moving the background light further away in the hope that it spreads more light across the whole background, or using another light on the right hand side.   There are other ways of setting up a high key shoot too, so I am going to investigate and practise these to see if my results are any better! 


IMAGE 3

BEFORE

This is a picture of my daughter Adriana, at the same studio shoot, not very happy about having to wear a hat! I do not believe that children should always be asked to smile when being photographed. Often, the most natural facial expressions can be captured when they are just left to their own devices, forgetting there is a photographer nearby, waiting to capture that perfect picture.  This image conveys this perfectly!

AFTER - “No more photo’s please mummy!”


            I converted this to black & white in Photoshop and adjusted the levels slightly to bring some lost detail back.   I also cropped it along the right side to show some composition.  As you will see from the histogram below, it is still over-exposed – but this is the result I wanted. 

In the original image above, the background is quite dark.  At this point, Adriana had been crawling around and was sat quite a distance away from the background which is why it looks a little dark.

These are the ‘before’ and ‘after’ histograms:

 Before

   After 

Still over-exposed!   Too much white at the right hand side of the histogram. 

IMAGE 4

I asked the children to lie on the floor, heads together, and I just stood over them and clicked the shutter release.  I wasn’t looking through the viewfinder so had no idea how this photo would turn out, it was purely experimental, for fun.   Despite the lack of composition and over-exposure, I really like the natural expressions on their faces! This was a favourite of the parents too! 

"Lets get our heads together!"


IMAGE 5

"Family is everything"

This image presents the same issue as all of the others – darker on the right side compared to the left side.  From this shoot, I have learnt how my studio light set up needed adjusting to ensure a more evenly lit background.  I used 3 lights – 2 at the front corners directed towards the models at 45 degrees (flashed when shutter release pressed), and one light to the side, directed at the background to inject more light here.  In future, I would try using 4 lights, one in each corner, 2 facing the models at 45 degrees (flash/strobe), and 2 facing the background, also at angles to ensure even distribution of light across the background. 

The children had let me photograph them for an hour and were so well behaved and accommodating that I agreed we would have some silly fun at the end of the shoot.
These are the resulting images:


This was the most important part of the shoot ... having FUN, FUN, FUN!